My Mac Plus case mod is complete! Its the most powerful Mac Plus ever in existance! (Athlon64!)
4/24/05: updated with pics
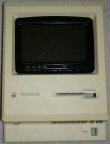
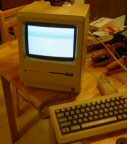 It all started with this macintosh plus that i got off of ebay. I had seen things online with
people turning macs into aquariums, which i’d seen online, and in the book “hardware hacking
projects for geeks” by scott fullam. The plus i got on ebay was still functional, and it came
with 2 keyboards, 2 mice, and 2 external hard drive enclosures (if you want one of those, send
me an email, because i’m only gonna hack those up for some random thing too!
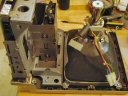
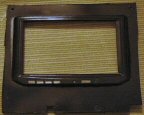
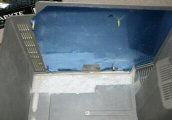
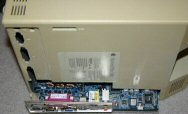
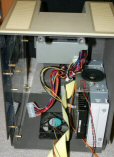
 Here’s a shot of the insides of the mac. Since the case is the only thing i need, this all has
to go. but i don’t want to do too much damage, as i want to mount a new monitor inside of
this, i need the screws and screwholes intact. Since putting another motherboard into a mac case has been done like a billion times
before, i wanted to put a whole computer into the case. I want people to think
it is a working mac! Well, people who wouldn’t know the difference anyway. But i’m not
going to leave a tiny little 20 year old monitor in there! I’m wanted to go high tech!
so i found this nice little 7″ widescreen lcd to put inside!
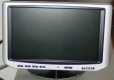 But since the new monitor is not 4:3 like the old, it doesn’t fill up the entire hole left
by the previous monitor. So out comes the plexi! I disassembled the LCD, took the face frame
off, and cut a matching hole in the plexi. I then epoxied the frame in, and sanded everything
down to prep for paint.
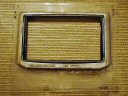
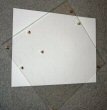
 Here it is prepped, and after a few coats of paint. Not an expert at the old spray paint, so
if you look real close you can see the eggshell thing going on. Most of this frame isn’t
visible when it is attached to the case, so it isn’t too bad. I thought about cutting out just
a hole the exact size of the LCD, but i’m not enough of a modder to relocate all the buttons and leds
on this thing!
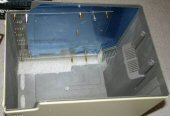
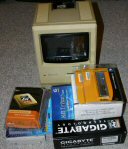 Here’s the monitor mounted in the case, and all of the stuff that is going inside! hopefully
those boxes are mostly packaging, because it doesn’t look like all that will fit… Here’s the
parts list:
- motherboard: MB GIGABYTE GA-K8S760M SIS760 RT (newegg.com)
- cpu: AMD Athlon 64 3000+ Newcastle (newegg.com)
- heatsink/fan: oem stuff that came with the cpu
- power supply: ENERMAX EG285SX-VB(W) SFM MicroATX 270W Power Supply (newegg.com)
- memory: CORSAIR Speed 512MB 184-Pin DDR SDRAM DDR 400 (PC 3200) x2 (newegg.com)
- DVD: TOSHIBA SDM1912-TA Beige IDE DVD-ROM Drive (newegg.com)
- hard drive: who knows? it was in the closet and not plugged into anything
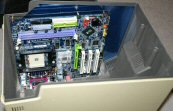
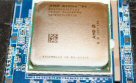
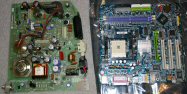 Here’s a good compare/contrast of the old mac mb and the new gigabyte one. Interestingly, they
are almost the exact same size! there is a BIG problem coming up, but you can’t tell from this
pic. if you knew the mac internals, you might be able to spot it right now, though.
Hint: which ways are the 2 facing?
 This is one of the details that you just might never notice, but i thought it was a pretty slick
touch. The signatures of a whole host of people are molded on the inside of the case! In this pic,
steve jobs’ signature is plainly visible right in the center. oddly, its all lower case. never
knew that before, but then again, i’ve never gotten a check from jobs, so i wouldn’t know.
 The original mac motherboard was actually mounted to the metal frame in that first pic, and that
metal frame was anchored to the front portion of the case. I can’t use that frame, because it
takes up too much space, so i needed to find a motherboard tray i could mount the new board to.
My first idea was to reuse a slide out tray from one of my other cases. The problem with that is that
the tray was way bigger than the motherboard and case, and because i don’t have any tools suitable for
that hardcore of work. So i decided to just use plexi. i drilled some holes and mounted some
metal motherboard standoffs in the plexi.
 I then mounted some on the inside of the case that i could screw this down to. I left the original
blue shielding (or whatever that is!) in the case, and just screwed through it.
 I then mounted the motherboard to the tray inside the case. In the second pic, you can see what
i was talking about in the pic comparing the sizes of the 2 motherboards. The original mac mb
was about the same size and shape, but rotated about 90 degrees, taller than it was wide. in all
of my original measurements, i’d kinda run into this, but i neglected the space that the monitor
would take up inside the front of the case, and some other math.
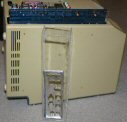
 I fabricated up a little box out of plexi to attach to the back of the case. The io cutout fits
right in there, so that works out pretty slick. After some sanding to round off the edges and
smoothing out the epoxy, i painted it up. it looks pretty decent, but since its the back, nobody
will ever see it anyway!
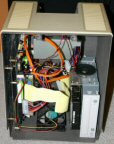
 After all that, i put in the chip, heat sink, and fan, so i could see where i could mount the
powersupply. its a microatx job thats pretty small. It turned out that mounting it to the top
would be the best place, i could cut out the back to allow air flow and power cable mount, and
a spot at the top near the carrying handle that is the perfect place to mount the fan and a grill.
I also marked out a spot on the bottom to cut out and mount an 80mm fan for intake. the bottom
of the case has little feet, so there’s some room for airflow underneath. I also fabbed up a little
bracket to mount to the dvd and hard drive, which also turned out to be a good place to mount
the pc speaker.
 Everything mounted up inside. You can see that the only way to get access to the DVD is to pop off
the front. I wanted to make the bottom of the front flip down, but there was no room to mount
the dvd horizontally there with the cpu fan in there. Since i plan on running linux on this thing,
i don’t need to use the CD for much, except in some rare cases, so taking the front off isn’t too
big of a deal.
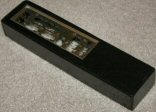
 You can kind of see it here in this picture, but i also fabricated up another thing, a place to mount
the power and disk LED’s, and a place for the power and reset switches. I stole all of those from
the case i planned on gutting the tray from. The old disk slot turned out to be a greate place
to hide those. The switches are tiny little black push buttons that were pressed originally by
bigger buttons on the original faceplate. the faceplate also had a plastic mount for the led’s,
which i cut down to be flat. I then glued all that into another piece of plexi which was i then
painted black. when mounted inside the drive slot, it just looks like its all in shadow, and
you can’t see the switches unless you’re up close. You can’t see the LED’s unless they are on.
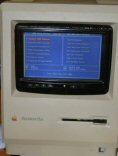
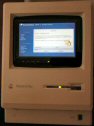
Plug everything in, turn everything on, and it all fires up! I then installed the free version
of Mandrake’s amd64 version of 10.1. I think. maybe it was just 10? After the system ran for a while, i realized how loud it was. I have a shuttle box running
a db and web stuff right next to it, and its pretty quiet. this new mac box was supa loud!
so i went trolling the Ars case and cooling forum to find some quiet fans. What i found
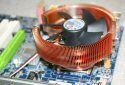
was a slick looking zalman copper deal that looked like it should fit. so back to newegg for that,
and some slim 80mm fans that appear to be used mostly for cooling off video cards:
- heatsink+fan: ZALMAN CNPS7000B-CU
- case fan: ZALMAN ZM-OP1 80mm
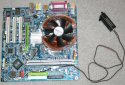
 You can see that the zalman fan has a long thing attached to it. its a controller to allow
adjustment of the fan speed from 100% down to however quiet you want it. Know what? there
is actually a PERFECT place for that in this case! the original mac had a contrast knob at
the bottom, which i had just hot glued into its original location.
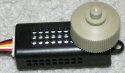 The contrast knob only needed a little work, involving just a little cutdown of the knob on
the zalman device and some hot glue. I then glued that into the inside of the front part
of the frame in the knobs original mac location. put everything back together, and fire
everything back up. Thew new fans are so much quieter. It is even quieter than the
shuttle pc next to it! and turning down the knob makes an obvious difference in sound,
but since its so quiet anyway, i have that all maxed out.
