 |
 |
Our paper mache Bobblehead halloween costumes were the best halloween costumes EVER! About 40 hours of work, several weeks worth of newspapers, 2 giant balloons, 20 little bottles of paint, 5 lbs of flour and some hot glue make a pretty good costume! More details and pics inside! |
We got the idea after seeing some guy in a giant Ichiro bobble-head costume on Ichiro bobble head day at a Mariners game. He was wearing a giant one that looked awesome!
|
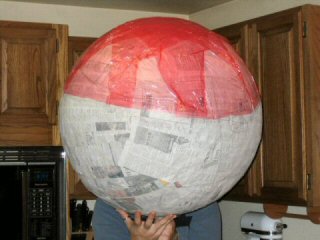
I spent a LOT of time and made a huge mess doing the mache. We used some giant balloons to do the head, and around 6-10 layers of mache on the whole thing. We had one minor/major problem, though. Since the balloon was so big, we had some problems with the size of the balloon changing with the heat in the house. During the day when it got a little warmer inside, they expanded a little. This is where the problem starts! Since part of the balloon was still wet, the dry part did not expand, and kept the balloon in the round shape there. But the wet part of the balloon stretched out to allow for the expansion of the balloon! So they would have one weakspot that stuck out and made a goofy bubble. we had to let some air out of the balloon, get the stretched part wet with mache, and smooth it back down. I even popped one of the balloons inside by accident, so i had to blow up another one inside the partially dried shell and then continued mache’ing over the original shape. The first picture i have of the mache process is this one, where i’ve put plastic wrap on the top part so that i can add a removable hat made of mache that will fit perfectly. It is also the first pic that gives you a good sense of scale, with me holding it up in front of my body. |
 |
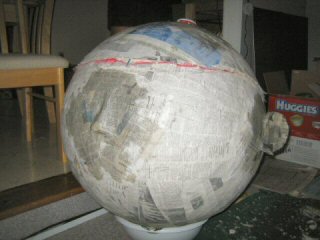 |
Here you can see the ears mostly done, and the nose in progress. The ears are cardboard from cereal boxes cut into the ear shape, with rolled up newspaper taped on to make the ridged shape. The ears had a flap edge that was then taped onto the head. Then the whole thing was mache’d over. The nose is all paper. Newspaper folded into thicker paper, then folded to make that shape, taped on, them mache’d over. You can also see the hat, mostly done. the hat layers are all there, as well as a button on the top made from lots of paper mached and shaped by using a cut down sour cream container to make sure it stayed round as it dried. Note to mom: there is no “news” in this picture! The “huggies” box in the background is for one of laura’s projects: diaper cakes |
|
After the heads were dry, we then started painting them. I hung them in the garage, and used a couple cans of white spray paint primer that we had around the house. Having a flesh colored spray paint would have been awesome, but we didn’t see any. We didn’t look real hard though! Its amazing how much spray paint a couple newspaper balls will soak up! |
 |
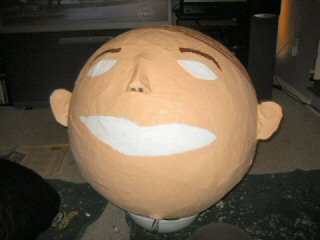 |
After priming, we then painted them with those tiny little bottles of acrylic paint you get at the craft store. We didn’t get any big bottles because we had no idea how much area the little ones would cover, and if the colors would be good. The skin tone colors we found turned out pretty good, though. The bottles seem to cover a large amount of area when you don’t need them to, and like 5 square inches when you only have one bottle! All in all i think we used about 20 bottles, many flesh/hair colors, and a handful of assorted other colors for eyes, lips. |
|
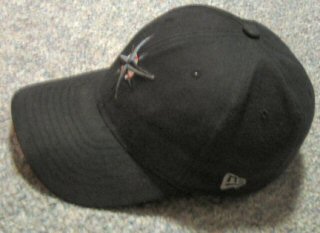
After painting up the heads, it was time to finish the hat. This is the original Mariner’s hat. The front has the M’s compass rose logo, but for some reason, the compass is printed at a slight angle though. The back has another compass rose overlayed on the with the Seattle “S”. The side has the new era flag logo on it. |
 |
 |
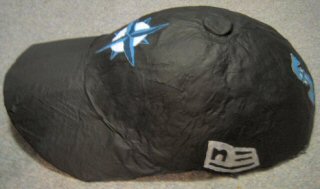
The hat is made from the paper mache’d base, then with a large piece of cardboard to make the rim. i got the cardboard wet with one layer of mache, then bent it and taped it to the base. I then put several layers of mache on the rim and the edge to make sure it became one big pice. Painting the details of the hat were pretty complicated. It took me probably about 4 hours total to do the whole hat. And working with something that awkward shape and size, while sitting on the floor can be killer on your back! |
|
The almost finished hat. This was before i did the red threads. With the red threads on the ball it looks pretty awesome. |
 |
 |
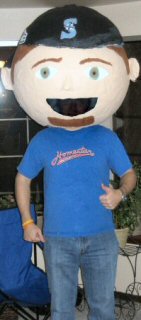 |
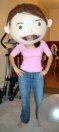
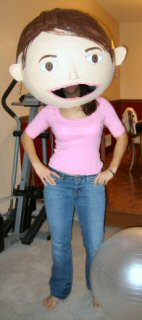
The finished products, complete with costumes! |
|
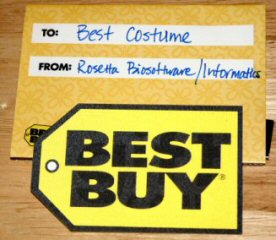
At work, as part of our annual halloween party, i won the prize for best costume! a $50 best buy gift cert! The best part was that most people didn’t know that the hat was removable. I had it on forwards for most of the party, and then took it off because it was getting heavy (and its impossible to drink a beer with that thing on your head!) When the prize part started, i had to put it back on, and this time i had the hat on forwards. At least one person remarked as i passed by, “Wasn’t the hat on the other way before?” |
 |

My friend and I are totally doing this for halloween. Really bummed that our idea has been done already – but hey, learn from someone elses mistakes.
Did the heads bobble?
Yup, they bobbled! We had ours attached to some construction like hardhats. mine was just a cheapass “bump cap” from when i worked at Del Monte in college, but laura’s was a real hardhat. i’d suggest something that fits tight on your head, like a football helmet with no facemask? or something that attaches to your shoulders or wraps around your body?
its amazing how heavy the paper mache’ is when you have something that big!
Hey John,
Hardhat/helmet idea sounds good. We’re working on these now and are wondering how to attach the actual head to the helmet to make sure that it bobbles.
Did you use an actual spring? (Like something you can find at the hardware store?)
Thanks for all your help. We’ll definitely have to send you pictures of the finished product!
We ended up using some thicker gauge wire, i believe they were basicly like 3 foot long “sticks” of wire, that were then bent into like a lightbulb shape? Like an upside down U that curves in more at the bottom.
there were 2 of those in each head, perpendicular to eachother, duct taped to the top of the head, and duct taped to the side of the helmets. Kindof like a lampshade? the wire/rod things had just enough resistance that they would bobble side to side and front to back and twist, but not move up and down too far.
That was probably the hardest part to find/rig up. And i think we threw all of that away after we were done with them. The heads themselves are now hanging below each of our garage door openers in the garage. When the garage doors are open, you just see these two huge heads staring out of the garage. Its pretty hilarious!
Hey,
Great job on the bobble head. It looks really professional. Do you make costumes for other people. It looks like it took a lot of time.
and patience.
Actually, I went to Providence on Halloween day to ‘Bruna Costumes’.
I got a giant penis costume.It was made by them. They make paper mache costumes too. You should check out the penis. I won first price of 1000..at foxwoods halloween party. It had rubber testicles and there was a hole in the top so you can put whipped cream coming out of the top or water or whatever.
It is not on their website. You have to ask . They keep it hidden in the cellar.
Hey john,
i randomly came across your site while searching for bobble head ideas, ive always wanted to make one and when i came across urs i really liked it.
i have a few questions.
-what happens to the balloon after you apply the paper mache?
-do i cut a hole in the bottom after painting?
-how do i do the wiring exactly?
can you please email me a step by step guide 🙂
(dictated, not read)
do you make costumes for random people like me
@Michael
Eventually, you either pop the balloon or untie it and let the air out if you need/want to reuse it. Popping it is generally easier. One of the tricks there is not letting the balloon get too much warmer or colder after starting the mache, otherwise the balloon will expand and rip through the wet paper.
I believe we cut the holes to an appropriate size after painting, just so we could see how everything looked before doing anything drastic with a scissors.
What we did for wiring was some thin metal rod from home depot that we bent and duct taped to the inside of the head, and then duct taped to the top of some hard-hats.
@Garrett : how much money are you going to pay me? 🙂
around $50.00
Nice try 🙂
when u say giant balloon. What size would you say exactly a 36 inch balloon?
that’s a good question, depends on how you’re measuring i guess. but that should be big enough. the best way is to go someplace that sells them, they usually have blown up versions so you can see how big they are before you buy them. then buy one that’s the size that you want.
I stumbled across this and 2 other sites while researching ways to make a bobble head costume, and this was my favorite. HUGE thanks! between your description and your comments, and a friend who already had some paper mache experience, this is gonna make a great mardi gras costume. i’ll post some pictures on our blog when i’m done….on another note, i’m glad this post is still up even though it’s over 5 years old. 🙂
hey! firstly i love your costume! you guys did a great job 🙂
secondly i was wondering… you said that you used a balloon in side, but than how did you have a whole to put your head into it? either i missed it or i just didn’t understand. If you can get back to me that would be great! thanks a ton!
These are great
Hi! love your costumes! What did you guys use for the mouth part? im thinking of doing a paper mache round mask, just smaller than what you guys did but kind of iffy about how id breathe and how to do an opening that wont really throw off the face itself. Thank you!
for ours, we cut out the space where the mouth is, and used a tulle fabric/mesh over that part that we painted. you can see/breath through it