Back when i wrote the post about building a pantry, i said that i thought i had used every tool i owned for that project…well… for this project, i used every major tool i own except one: my miter saw. I would have used the miter saw if it had a sharper/newer blade. And if i had a better place to use it than on the floor. And if I had a better one. For the closet doors project, I even bought some new tools that i didn’t have before!
| Before: | After: |
|---|---|
 |
 |
For more details and more pictures, follow the jump!
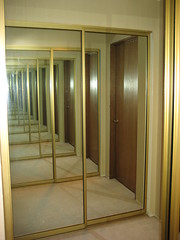
We’ve never liked the “gold” look of the old mirror doors, and once we repainted the room and put in new carpet and trim, they just didn’t look right. So we started looking for some frosted “by-pass” doors, as they’re apparently called. We found some we liked at a door store, but they were about 1 1/4″ thick, heavy (solid wood+glass), and $449 a piece. We would need 4 (thats 1796+tax!), and special mounting/install because they’re so heavy. While looking at them, i told laura that i could make 4 doors myself and it would be cheaper even if i had to buy tools! She was doubtful, but she at least let me try! So while off at Lowes one weekend for some other thing, i bought a couple pieces of 1″ (3/4″) select pine boards, and a small piece of plexiglass to see if i could make some prototypes and see if i could actually do it.
I tried a couple different ways of making fitting them together:
1) a groove down the entire length of each side, with rails with a tongue on each end. It worked ok, but i didn’t like how how it looked and how i’d have to fit the glass in.
2) mortise & tenon, with a rabbit along the inside edge of all 4 pieces to set the glass into. I didn’t have a mortiser or a tenoning jig, so for the prototype i just used the table saw and dado setup to cut a quick and easy tenons, and used the drill press and router to make the mortices. it was a little more complicated than just a groove, but i liked it a little better.
I was was going to try to do a third, using matching router bits like you’d use to make cabinet doors, but i’d have to buy a better router (i probably should do that anyway if i’m going to make more stuff).
| Prototypes | |
|---|---|
 |
 |
I settled on the mortise and tenon route. I bought a tenoning jig for the table saw to do that a more correct way, although mine were simple enough that i probably could have done it by just using the dado and lots of different passes. I don’t know that it would have been any less work, and plus its one more tool i learned how to use! I was looking for a mortising attachment for my drill press, but it looks like most of them are made for either specific drill presses, or the generic ones work with bigger/floor standing ones. So for the mortises i ended up making a little jig and using the drill press for the start/stops of the mortises, and then my little router table with a straight cutting bit take out the space between. Which technically makes them not square mortises, but hey! i tried squaring them up with a chisel, but it was going to be a lot of work that nobody would see, so i quit that. Although if i were to make more things like this, i’d probably shell out the cash for a little dedicated mortiser.
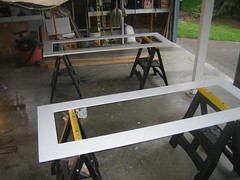
Nothing about making the doors was that hard, but because i was making 4 doors, and each door had 2 pairs of pieces that were mirrored images of each other, i did have to do everything 16 times. But that was a good excuse to set something up, run a test piece until it was right, then lock everything down with guides and clamps so that it was like a little assembly line. It was basicly just busy work, repeated over and over and over. I swear i spent all day one saturday running pieces through the table saw on the tenoning jig. 8 pieces x 2 ends x (2 cheek cuts + 2 shoulder cuts + 2 face cuts + 2 side cuts) and i don’t know how many that is, but that’s a lot! 😛 Then its just some gluing and sanding!
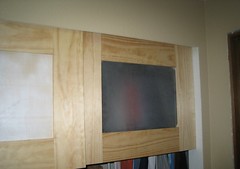
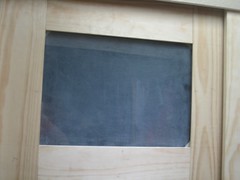
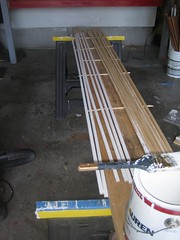
The windows are giant pieces of plexiglass that i sanded on one side. Which is where new tool number two comes in: a random orbit sander. On the prototype i used the little mouse sander we have, and for a piece that’s only 14×20, but the windows were about 69×20 and would take forever with that little sander! The belt sander went too fast and made obvious sanding marks in one direction, so i needed a random orbit! Cutting the plexi was a little complicated because the sheets are pretty big and bendy, and i didn’t want to break one accidentally. I used masking tape and cut through that to avoid chipping/cracking the plexi and it worked great, but man can a cut edge of plexiglass be sharp! i had lots of little nicks and cuts from doing the windows. After cutting it to the right dimensions i removed the plastic backing from which ever side looked worse, and then sanded it a few times with 120 grit, wiped it off, then sanded a couple times with 220 grit. it worked pretty good. it was interesting how much static electricity sanding the plexi generated, though. after taking the plastic of the other side, it would pick up almost any dust that was in the air, and you could feel the static just holding your hand near the plastic.
To hold the windows in i had some 1×2 pine that i rounded over the edges, then cut off a 1/2″ strip to make trim. and then i rounded over the edges again, and cut off another 1/2″ strip off of each side again.
| Painting sucks | |
|---|---|
 |
 |
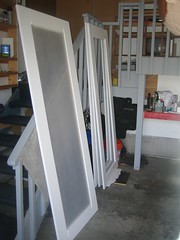
and then came an insane amount of painting. the painting was the worst part of the whole project. There was only room in the garage to do two at a time, so i sanded everything, then primed one side of each door. then let them dry. then flip them over. then prime the other side. let that dry. then stand those 2 up, and get the other two down. then prime one side of each, blah blah blah. then sand everything again, then paint everything. then sand everything again. then paint everything again. yaaaaay! Then after they’d dried again i did a very light sanding to clean up any little things here and there.
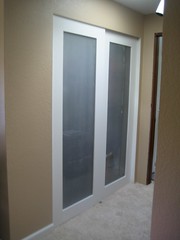
Then it was just a matter of dropping in the plexiglass window, and cutting the trim pieces to fit, nailing them in to hold the plexiglass in place. The mounting hardware was pretty simple, screw a track piece to the closet door opening where the original doors were, screw some brackets with wheels onto the doors, and hang them.
| Done and Done! | |
|---|---|
 |
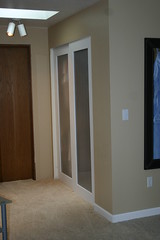 |
All in all, including the supplies for prototypes, new tools, wood and plexiglass for 4 doors, and paint, i spent less than $500. It took me about 4 weekends, although it wasn’t full weekends, it was a few saturdays, couple hours sundays, etc. And about half of that time was painting, but even my hourly rate would still cost less than what the tax and install costs of those other doors would have cost!

Leave a Reply