After Action Report: Tough Mudder Seattle

finish line

If I had to describe Tough Mudder in 2 words, the nicest version would be “holy hell”. If you don’t already know what it is, Tough Mudder is an adventure-style race. It’s generally 10-12 miles, littered with obstacles. And the obstacles are crazy.

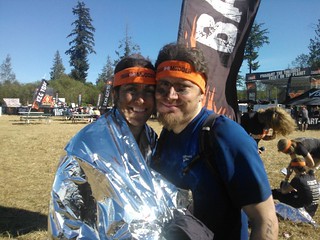
Laura and I were on a 4 person team, “Birthday Cake”, as it was one team-member’s birthday. Beside Laura and I, the other two ladies on the team (Buffy and Erinn) are women we know through Columbia Athletic Club, the gym we go to. Well, actually, one of the ladies on our team is a trainer at Columbia, who Laura sees regularly, and who I’ve been working with once a week since the “spring challenge” starting in April. Anyway, back to the race challenge!

Here’s a helpful map:

toughmudder

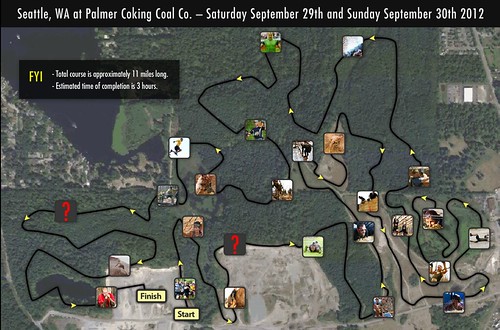
The Seattle course turned out to be 12 miles (not the 11 stated on the map), with 2 “surprise” obstacles that they wouldn’t announce beforehand. The map shows a bunch of obstacles that we didn’t have, but is missing some that we did have. The notable ones (not in any particular order):

  1. arctic enema
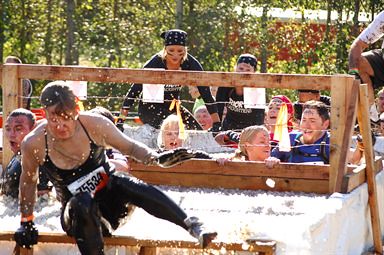
Artic Enema. The 2nd obstacle of the day, after crawling through some mud under some barbed wire. Picture a long dumpster filled with ice water. Then, just before the race starts, picture a fork lift dumping a crate of ice in to top it off. Then, halfway across the dumpster, put a wall that extends down into the ice water. Then place barbed wire over the top of the wall, forcing you to go under to get through. The wall was surprising low, and I just can’t explain the feeling I had as I went under the wall and got stuck. I had about 2 seconds of panic as I realized my camelbak got stuck on the lip of the wall. Then, swim up and the rest of the ice filled dumpster and climb out. 5 minutes in, frozen, and freaked out 🙂
  2. shocks on the rocks. belly crawl through water+muck, with live electrical wires dangling down. this one wasn’t too bad, as I could stay low, push off, and slide across the mostly smooth plastic flooring covered in muddy water. if it had been rocks, this would have been hell. I only got shocked a few times, and they were in the hips, making my whole leg seize up. crazy.
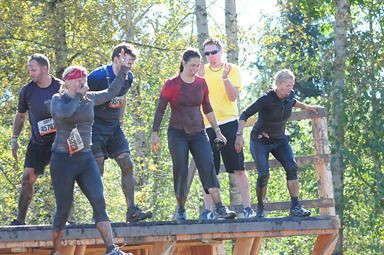
  3. Berlin walls 1 & 2. Vertical wood walls 12 feet tall, in pairs. there’s one foothold at the bottom, maybe 2-3 feet off the ground. I got used as a ladder for this one, boosting people up by doing a wall sit, then having people step on my thigh, then shoulder to get to the top. I managed to get over them myself, with a quick hop up and off the foothold, and pulling myself up and over. There was also a 3rd wall challenge, where you had to climb some logs first, and kind of jump from the last log to the wall, then climb over.
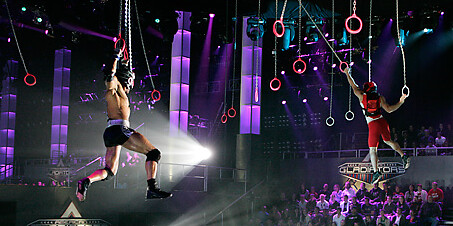
  4. Funky Monkey & Rings. Funky monkey is a set of monkey bars that follows the slope of a roof. the first half is ascending, then the second half descending, probably 5 bars on each side. and the bars spin in the holes. If you can’t hang on, you end up in a muddy lake. On a normal day at the playground, I might be able to do this. but with the ascending/descending part, and the distance between the bars, I wasn’t sure I’d be able to do this one. But I took it slow, and used the spinning of the bar to my advantage. it let you hold onto the bar and let it rotate to swing, instead of having to have your (wet, muddy) hand slide on the bar. I got through this one and stayed dry. The ladies, not so much. Later on, there was another similar challenge, with rings instead of bars. Slow and steady, with a nice swing between them, and I stayed dry on this one too (although I almost derp’d the landing and fell in!). Again, the ladies, not so much. The rings were especially enjoyable, as it made me feel like I was on American Gladiators!

    gladiators

  5. walk the plankWalk the plank. After staying dry on the bars + rings (and climbing a giant hill, and climbing down said giant hill), there’s no way around this one. Climb up to a platform, then jump ~15 feet down into a muddy lake. Personally, I’ve never jumped from that high into water. Plus muddy shoes and a camelbak? And it was a lot deeper than I expected (I never touched the bottom), and it was shockingly cold. Laura’s legs cramped up on the swim out, so that wasn’t good. The lifeguards gave her some salt to eat, and she walked it off.
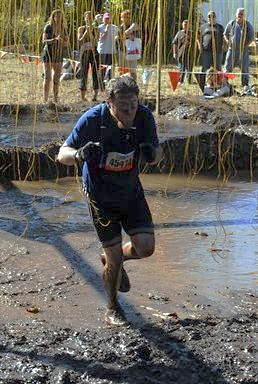
  6. Boa Constrictor. We saw this one very early in the race, but it was one of the last ones. you see it, then wind way away, and don’t wind back that way for 10 miles. A giant plastic culvert pipe heads downhill, into a little pond, and another pipe goes up from the pond back to the top of the ditch. It looked much worse than it was going to be, the pipe was mostly smooth inside, which was refreshing after crewing through all the rocky stuff we’d been through earlier. getting down was much easier than getting back up the other side, though. the pipes were pretty smooth inside, and they were small enough that you couldn’t really use your knees.
  7. Fireman carry. You had to carry someone for 100 yards. Laura gave me a piggyback ride, then I tried to carry Laura using a true fireman carry. I could only do it that way for about half the distance, then gave her a piggyback ride. when was the last time you gave an adult a 100 yard piggyback ride?
  8. Zig-Zag. I’m not sure the real name of this obstacle, but it was my favorite. climb up a near-vertical 30 foot muddy hill. Move over 25 feet, and climb down the near-vertical muddy hill. Repeat a few more times, up and down, up and down. I don’t know why it was my favorite, but I enjoyed it!
  9. Random other things. carrying logs, climbing a vertical rope net, climbing a rope net on the face of a steep hill, climbing under barbed wire, climbing over and under logs, slogging through mud, swamps, climbing through a narrow underground tunnel, etc.
  10. Everest. This is one of the last challenges, and one of the few that is impossible without teamwork. It is a giant plastic quarter pipe. And it’s wet, and slippery. so you can’t just run up. but since it’s a quarter pipe, you can’t just stand there and get close enough to the top. so you run up, reach, and grab people who are already up there. you try to climb and they try to haul you up. We saw several people attempt, and try to leap and grab, only to slide out of someone’s hands and bang their head on the pipe as the slide down. And the slide makes that humiliating “screeeeeeeeeeeeeeeeech” noise as you slide down face and hands first. Everyone on our team took at least 2 tries, except Laura might have made it on the first? This was one of the last obstacles, so you’re already 11+ miles in and physically abused by the time you get there.
  11. electroshock therapyElectroshock therapy. As if the early one wasn’t bad enough, this one is a much longer field of live wires hanging down. probably “only” 20 yards of distance, but about a food of muddy water and a berm (hay bales? I don’t remember) in the middle. I’ve never been shocked like this before. Each time I got hit there was a loud “SNAP!” and entire parts of my body tightened and tingled. Some were weak, some were strong, but every time you heard a SNAP from anyone around you, you flinched. I just tried to run through, and about halfway I kind of found a path that was reasonably clear, but I probably got shocked about 10 times total. OUCH. Some people belly crawled through, literally face in the mud, to avoid being shocked. Others ran through and hit wires and BAM, ended up in the mud unintentionally.
  12. BEER! When you finish, they give you a bandana, some protein bars, bananas, a t-shirt and a cup of beer. so that was nice. Sadly, we ran the last heat of the day, so most of the other stuff was shutting down, the band was done playing, most of the stalls were cleaning up, etc. Only ~1500 people ran Sunday, but 7000+ ran Saturday. that would have been a sight to see!

All in all it was a long, exhausting day. It was lots of fun though! I expected to do way worse, as I’ve never run anything nearly that long. I’ve done some 5k’s, and I’ve run farther than that on a treadmill, but nothing close to 12 miles. I also got through pretty much all of the obstacles, clearing walls by myself, and getting through the rings and bars, so I’m pretty stoked about that.

scrapes

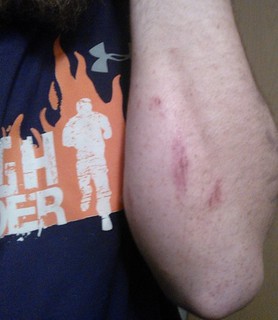
If we were to run it again, I would do some stuff differently, though. I wore shorts and a dri-fit style running t-shirt. with all the crawling on rocks and dirt, that left my knees and forearms and elbows completely unprotected; they are now painfully cut and scraped. The ones on my forearms are particularly lame, as it means i can’t really rest my forarms on anything, like i normally would when typing, ec. Next time, shorts that cover my knees, and 3/4 length sleeves at least. you spend so much time wet, that sweating through a long shirt isn’t really going to be an issue. I would have also used sunscreen on my face. you can’t really see it well, but they use a permanent marker to write your bib number on your forehead and arm, so when your bib comes off (it will!) you’ll still have your number. the number came off my forehead, but now I have a very faint sunburn outline of 45474 on my head. 🙂 The other problem I had was getting mud+crap in the tops of the ankles of my shoes. I’m not sure how to avoid that, but it sucked. Running it Saturday instead of Sunday would be fun too, as there’s a lot more people helping each other, and a lot more festivities at the end.

Posted in General Tagged with:

Funny Things Easton Says: Part 2

Chilling, waiting for a haircut...Easton is now almost 4.  I figured I’d have a “part 2” to follow up on the original part 1 before this, but, you know.  Things.  They come up.  So I’m a little behind schedule on this one. 🙂

  • “Gwirl” (rhymes with “Squirrel”.  This is how he produces the ultra simple word “Girl”.  It is one of the funniest things he says.  sometimes I try to correct him, and he says “no, it’s gwirl!”  If you didn’t hear it all the time, you probably wouldn’t notice it.  but now that I’ve pointed it out, you’ll hear it too.
  • “my friend pogo-stick” – for a while, we think easton had an imaginary friend that he had named “pogo stick”.  no idea where it came from.
  • “my friend robin” – now he’s in a HUGE superhero kick, so now his imaginary friend is robin.  So that’s a good thing, it means that he’s the lead, and he has at least one sidekick.  So tonight before bed, he was looking through his books, and said “I don’t want to read this one, I just want to look at it to see if Robin wants it for his birthday”
  • “This sounds like a job for [superhero]!”, where [superhero] is whichever super-hero shirt or pajamas he is putting on.
  • A whole set of words where he just drops the first (few) syllables.  I’m not sure if this is just the hip new thing that kids his age are doing to save typing on twitter or what:
    • “-chine” for “machine”
    • “-cado”, for “avocado”
    • “-nected” for “connected”

Of course, there are a bunch more, but now that I started writing them down I can’t think of any!

Posted in General Tagged with:

Project: Toy Car Garage

Like I said last time I built something, every time Laura and Easton (and now Barrett) go somewhere for a week,

I end up doing some project that consumes all of my free time, and half of my sleep!  I finally have some time to sleep in and relax, but no;  I do a woodworking or home improvement project instead.

This spring, same thing, for the third year in a row.  The project this time was a “garage” for all of the toy cars we have.

This is the problem:WP_000254

There’s a pile of cars that gets stacked in this corner every night.  If you look close, you can see that there’s even another garbage truck over there on the right side of the pic up under the desk in the kitchen.  Cars everywhere.

So laura wanted me to build a garage/shelf to put in that corner to neatly organize all of that…”stuff”. So I did.  And like always, it took way more time than I expected.

Before they left, laura and I measured out the cars and did a rough sketch of what cars could go where to figure out the general idea of what we wanted.  Originally, that meant a shelf that was 4 rows tall, and in the original drawing, that didn’t look too bad.  but once I started doing the math, our sketch was nowhere near accurate for height.  A 4 row shelf with the heights we needed would have been 48+ inches tall and been HUGE. and once you cross 48” then things start getting complicated and expensive as well, as you can no longer cut that piece from the “short” dimension of a standard sheet of plywood…

WP_000313

So I “edited” the shelf down to just 3 rows, making it ~39” tall, ~32” wide, and ~20” deep.  That lets it fit in that space without moving the tv stand, and would make it just about the same depth as the tv stand, so it won’t stick out funny.

WP_000233 (2)

Build wise, I was going the simplest route.  1/2” plywood (12mm, technically?) for the carcass, with a face frame built from some wood left over from the theater cabinet.  The dividers and the back are 1/8 fiber board, which just happened to be the cheapest nice looking stuff I could find at home depot.  I cut dados in the sides for the shelves, then in the tops and bottoms of each row for the dividers.  I left a lip above the top shelf so that cars could go up on top too, and not roll off.

WP_000235

Test fitting some trucks and tractors to do the final decisions on the widths of each parking spot.  In the original drawing, the first and second rows were the same widths, but the bottom two rows would be specific widths for specific trucks.  When doing the final planning I rearranged and re-measured in order to simplify and make everything as symmetric as possible, and got it so that the bottom row was the only one that needed a specific setup, as that crane is super frigging wide.  But each row is a different height, 12” for the bottom, 10” for the middle, and 8” for the top.

WP_000236

Cutting the grooves for the dividers was the most stressful setup, since I had to cut slots in the top of one piece, the tops and bottom of a couple, and just the bottom of one.  and they all needed to be in the exact right places so that the dividers would be perfectly vertical.  This is one of the reasons I was glad to get the top 2 shelves to be symmetric widths, that made a lot of the setup much simpler, making the bottom shelf the only special case.  And even the bottom shelf had symmetric outer spots, so that wasn’t any more complicated.


WP_000239

Here’s a shot with the face frame on. The face frame also has lip on the top edge, so that the cars and trucks can’t (easily) roll out.

The only “derp” mistake I made during this project was doing the face frame.  I planned on using pocket screws to do the face frame, set everything up, and drilled the first pocket… and realized that it would be visible on the top edge, since there’s a lip on the top edge.  I figured I could just fill that and you might not notice it after it was painted, but it still made me stop for a while and figure out if there was another way to do it.

WP_000244

Here it is, all primed and ready for paint.  Painting this thing was a giant pain; there’s just sooooooo much surface area to cover!  and much of it is inside, where it was uncomfortable to get to with a brush.  If I were to do it over, I might have left it apart, and used a spray on primer instead, then assembled the whole thing and done touchups.  I’ve never been very consistent with spray paint, though.  During the process of priming it, I realized that there was no way I was going to also paint the whole thing.  I just didn’t have the patience.  Or pain tolerance.  So to match the tv stand and other furniture in the room, I decided to do the outside and the face with the same black paint Laura used on the end tables.

WP_000252

Mood lighting!  To kick the fun factor up a notch, I decided to do some lighting too, and home depot had this really slick cree LED light rope that you could cut to your specific dimensions, and was dimmable.  As you can see in the pic, it works great.  Except the middle row.  For some reason, after doing all the measuring and cutting, somehow, the outside 2 LEDs on each side of that strip don’t work.  It isn’t quite as bad as it looks in that pic, and I cut a triangular section out of the back of the dividers there so that more light gets into those sections.  once they’re full of trucks, it isn’t that noticeable anyway 🙂

WP_000255

The after pic!  It looks like the inside is the same color as the wall, but that’s just coincidence.  The primer and the wall are very similar grey colors, but not the same. Scroll back up to the top and compare+contrast.  all of the stuff in that pile is here, aside from the hobby horse + foam rollers that were in the corner.  Easy has decided to donate the green garbage truck in the shelf, so that the other garbage truck in the kitchen can fit in with all his friends.

WP_000256

With the backlight on.  In this pic, the light is cranked up to full, but in practice we have it set to nearly the lowest setting, which gives just enough light to be noticeable, but not enough to be distracting.  The controls for the light are up on the top, in the back corner.  I wish it had a little bit longer cord, but this way it is out of the way and isn’t an attractive nuisance for little boy hands 🙂

The shelf is already coming in handy, as the height and layout makes it very easy for Easy to put his toys away himself.  So the last few nights when he wants to play something else, I tell him he has to put all his trucks away first, and he starts stuffing things into spots. 

Posted in General Tagged with:

Trying out TFSPreview

For my home development projects, I’ve been using the “Basic” setup of Microsoft Team Foundation Server for years. I have it running on my “server” box in my garage, but pointed at a Sql Server Express database instead of a full Sql Server install.  (Apparently, there’s going to be an explicit TFS “Express” version in TFS11?) 

Aside: why am I not using something like github?  To keep my stuff private, I’d have to pay ~$7/month for 5 repositories.  the way I have things setup in TFS right now, I’d have more than that, requiring their $12/month plan.

As part of the upcoming release of TFS 11, the TFS team has also started hosting an online, Azure based version of TFS, currently running at TFSPreview.com.  Running, maintaining, and backing up my local TFS has been kindof a pain, so when I saw this cloud based TFS, I looked into using it.

Conveniently, there are TFS Integration tools that can migrate a local server version of TFS up to the cloud based version.

However, I ran into some things right away.  And since I was at a brownbag presentation today by Scott Hanselman where he told us to blog stuff instead of just sending emails, I’m going to blog about it!  So there!

Work Item migration

When I created my TFSPreview project, I chose the default selection for workitems, the “Scrum” template. But it appears that when I created the project on my local machine years ago, the scrum template didn’t exist, and I used the “Agile” template (IIRC). So that meant that all of my bugs/tasks/etc don’t migrate, I get a ton of errors about missing fields, etc.

It would be really nice if there was a standard migration configuration when moving between some of the standard templates.  I know there aren’t fields that map, but for my one user home development purposes, I didn’t need all those fields anyway!

That was taking a lot of mapping settings, so I decided to just skip workitem migration and see if file migration would work.

File migration

Apparently for “demo” purposes, the migration includes a purposeful conflict to make you resolve it:

We left this conflict in the demo to illustrate how conflict resolution works. We could have used features such as cloaking to proactively avoid this conflict. To find out more about cloaking, go to TFS Integration Tools – What is the difference between cloaking and scoping branches?

http://msdn.microsoft.com/en-us/magazine/jj130558.aspx

The problem is that none of the suggestions appeared to work for me to resolve the conflict.  Following the instructions just got me to an error:

System.InvalidOperationException: Sequence contains no elements
   at System.Linq.Enumerable.First[TSource](IEnumerable`1 source)…

From my quick perusal of the tfs preview connect forums, there were several similar posts, but no resolutions.

The second quoted sentence, suggesting to use cloaking, doesn’t tell you that once you save the migration, you can’t do cloaking.  So to get around this, I had to make a new migration configuration, and manually cloak the BuildProcessTemplates directory from the migration.

After doing that, all of the files migrated, with history/etc intact!

However, it appears that when I created the new migration configuration, I forgot the user mapping step, so all the changes have my local username instead of my TFSPreview id (my Live ID), so nothing looks like it was changed by me.

Delete me!

So now that I’ve spent a few hours and gotten something working, I wanted to delete the Team Project I migrated to on TFSPreview… but you can’t using the web tools.  You can only do that using the command line tools.  And specifically, you can only delete a project using the visual studio 11 preview/beta tools, which I don’t have installed!  So much for a cloud only solution. 🙂 I guess I’ll have to do the deletes from work, where I do have those things installed.

Try Try again

Tomorrow night, I’ll try creating a new project that uses the agile template and see if everything migrates without me messing with anything other than user migration.

Posted in General Tagged with:

Ben Avery Review #3: Lotsa-shotguns edition

They say, “Variety is the spice of life.”  That’s almost the perfect description for my 3rd trip to the Ben Avery shooting facility during our annual spring break trip to Arizona.

This year, Jimbo, Art, and I shot trap again, but rotated through a set of shotguns to see which one we liked (or which ones liked us) better.

The trip to Ben Avery is always one of my favorite parts of the trip, even if it is only a couple hours of our week.  This year, I even remembered to bring my earplugs and shooting glasses.  One of these years, I’ll have a trap gun of my own, and maybe I’ll bring that along as well.  And maybe by then, Easton will be joining us.  But that’s a long way off :). 

The gun I shot the best with was a Browning. In the picture, it is the beautifully engraved one near the center.  It might be something like this one, but I’m not positive.  the engraving looks the same to me, and it did have a stock like that one has.  It is a beautiful gun.

This year, after having been there a couple years previously, Jimbo and I dressed a little more comfortably, wearing shorts and t-shirts, instead of jeans like we did last year. 

And again, it was a beautiful, blue sky sunny day.

While we were setting all our stuff down and getting ready, Art went to get us signed in and ready to go.  And then some dude stole our bay!


So we packed everything back up, and moved over a bay, and unpacked again.

After one round, a random dude joined us, but other than that, it was the same setup and just as much fun as last year, just with more guns!

The only other interesting this this year was that Art was trying out a new gun, a pump action one! 


Of the three of us, Art probably still shot the best, even using the pump gun that isn’t really the optimal setup for trap, compared to some of the other guns!

When the end of the day looks like this, with a ton of boxes full of empty shells, you know you had a good day!


Like always, I’m ready to go back, any time!  I wish there was a huge range like this as close to us as this range is to Art!  Although it is probably good that there isn’t a range like this that close, or I’d spend all of our disposable income on ammo!

Posted in General Tagged with:

Updating my office, again!

About 5 years ago, we redid my office.  Well, now that there’s another little being on the way, my office is transforming back to bedroom form. So i had to update my office again. This time, there ended up being a little… well, consolidation.  An entire room of stuff is now in this:

Over the years, “Nerd Central”, as my office was once known, has slowly gone from 3 computers, 2 monitors, 2 printers, a television, surround sound receiver, a small mixer to manage the sound output to one set of speakers, and a huge random assortment of other electronics down to just a single desktop computer and xbox with a single monitor and computer speakers, and the 2 printers (one inkjet, one photo)

and now that setup has been slimmed down to pretty much the bare essentials.  computer, monitor, printer, and 360.

Since this pic, some books and other assorted stuff fills in the empty shelves, but its working well so far.  When I work from home, I can pull out the shelf above the keyboard, put the laptop there, and plug it into the monitor and network, and use the laptop keyboard and mouse separately from the desktop.  It would be nice to have a usb+dvi kvm switch so I could use just one keyboard and mouse…It also looks like I could get a much bigger monitor to fit inside there, that would increase my productivity immensely!

There’s also a small shelf up against the wall (behind that door) that has some other assorted stuff, including the photo printer.

The nice thing is that when it is all closed up, it looks rather clean.  I’m sure it will get a lot messier inside, but at least I can close it up and keep little people fingers away from all those tempting buttons and blinking lights.  At this point, it doesn’t lock, so I’m thinking about adding a little lock to the top, so that Easy can’t open it up. 

I also had to go back into the crawlspace yet again to run cat5 to that wall so that I have wired network access there. Wireless is fast, but it isn’t gigabit fast like everything else wired in the house.

So where did everything else go?  Over the years, a lot of the “headless” stuff, like the webserver and the home media server have migrated to the garage, where the fiber comes into the house.  The old CRT television was recycled years ago.  A bunch of the books went to my office at work, I’ve kept some, recycled a huge amount, and have 2 stacks to go donate either to the library at work, the library, or whoever will take them.  A lot of the other stuff is still in the process of being thrown out or being recycled. 

About the only thing we don’t have a plan for so far is the huge collection of bobble-heads we have.  There are shelves along two whole walls that are full of mariners, brewers, and assorted other bobble-heads.  There hasn’t even been space for the 2 we’ve gotten this year!

Posted in General Tagged with:

Project: Theater Cabinet

I don’t know what it is, but every time Laura and Easton leave for a week, I end up doing some project that consumes all of my free time, and half of my sleep!  I finally have some time to sleep in and relax, but no;  I do a woodworking or home improvement project instead.  Last May it was redoing the stairs.  This year it was a cabinet for the theater room for dvds, games, books and things.  We couldn’t use a floor standing one, as that corner of the room has an electric fan forced heater that requires clearance space.  So the cabinet had to be a wall mounted one.  Sounds like a project!

friday night planning

Friday night planning session. just me, some notebooks, a tape measure, and a roll of thin mints.  the little notebook is my construction projects one, the big notebook is one I do other stuff in.  The metal template is for drawing phone software user interface elements, but I was mostly just using it as a ruler and straight edge.  I originally designed it without a center divider and having fixed shelves, so I’m glad I slept on it before starting it.  I think this way turned out a lot simpler.


WP_000174          WP_000175

The carcass, and the face frame on top.  The carcass is 3/4” birch ply, the face frame is whatever oak home depot had.  the back cleat is cut at the center at 45 degrees to make it a “french cleat”.  You screw one half of the cleat onto the wall, and then other half of the cleat gets attached to the cabinet.  that makes it super easy to install and remove.


WP_000178

tongues and grooves! grooves and tongues! this always takes forever to set up, but once everything is ready, things go pretty quick.  Getting the dado at the exact right height to make those tongues exactly centered and the right size took forever.

WP_000179           WP_000182

done!  the windows are plexi, with the back sanded to make them semi-opaque.  The inside of the cabinet is stained, the outside painted “sweatshirt gray”, the same color as the walls of the theater room.  We decided on the gray color, as it would hopefully make the shelf blend in and seem smaller than it is, instead of black (to match the other furniture) or white (to match the trim.) Painting is always my least favorite part of these escapades.  I’d much rather be doing the rest of the project than any of the painting.  I used to dislike staining things, but now that is sooooo much simpler to me than painting.  And I think that most of the stains smell better than latex paint, too.

You can’t see it, but the sides and center have shelf pin holes for adjustable shelves.  I had to buy a jig to do that, so the jig and the self centering big that went with that were the one new tool I ended up buying for this project.  I kindof wish I would have gotten the shelf pins that have the fancy sleeves, as the holes aren’t super clean in the plywood.  Next time 🙂

Done 

here it is, installed.  I still have to make some shelves to go into it, but that’s just a bunch of straight cuts, and maybe some biscuits.  If I’m feeling fancy, I might use the router to route little slots for the shelf pins to fit into so the shelves can’t slide out.

I might also have to find some super rough sandpaper and scuff up the windows a little more, as from the picture above you can still mostly see into them.  With the overhead lights off (they’re on for the picture), you can see a lot more than normal, but it’s still a little too clear. 

I also have to find some hardware for the doors.  I was originally looking for knobs the same size/shape as our entertainment center, but since this cabinet is a different color, it doesn’t need to match exactly.  With the really tall doors, it might need some thinner, taller pulls instead of knobs too.  we’ll see what I can find around… With the area in the corner, I’m thinking about putting some hooks/hangers on the left side, to hang xbox/ps3 controllers or something in that hidden space between the cabinet and the wall.

Posted in General Tagged with:

Random Review: Alan Wake

alan wake

Alan Wake was one of the most interesting games I’ve played in a long time.  The story was an actual story.  Well, it was really a story about a story, in the form of a game about a story.

A lot of companies have tried to do some kind of “episodic” game, and of any, I think this game could have actually pulled it off if it had been released that way.

The game was set up as several distinct “episodes”, that had a setup of “Previously, on Alan Wake…” and then re-told important parts of the previous chapters.  It was a fantastic way to get you back into the game when you start a new chapter.

As the game went on, the episodes got longer and longer, so it wasn’t as episodic as the first few.  Every time I thought “this is going to be the end of this episode,” it just kept going.  And partway through, I thought I had part of the story figured out based on something a character said, but the story totally went another way.  I really enjoyed finding pages of the manuscript, which explained little things in the story that were happening or were “shadows” (pun intended!) of things to come.

Gameplay wise, it was different than almost anything I’ve ever played.  For most of the game, you have 2 weapons: a flashlight, and a gun of some kind.  And yes, the flashlight is a weapon!  This might also be the first time that a game had a flare gun that was truly truly useful.  It was like the game’s equivalent of a rocket launcher, and it was fun to use!

The story completely set up DLC and a sequel, so this is another sequel I’ll be excited for!

Posted in General Tagged with: ,

Random Review: Metal Gear Solid 4: Guns of the Patriots

The game begins in disappointment: you’re forced to install a console game.  So before I can even do anything, I’m forced to wait 8 minutes.  Great initial experience there.

During the install I’m forced to watch a dude on screen chain smoke the whole time.  Some of the “hints” it gave during this install (emphasis/commentary added):

  • konami is not responsible for any damage resulting from misuse (misuse of what?)
  • this game is intended for use exclusively with the PLAYSTATION3 system. (no crap, really? is that why its only available on the PS3? where else would I play it?)
  • cigarette smoke has detrimental effects to you and those around you, particularly infants and children.
  • put litter in its place.  dispose of ashes in ashtrays.
  • ensure that you play in a brightly lit room and sit as far away from the screen as possible (except sony makes this impossible, as I need to charge my ps3 controller, and the cord they give you for that is like 3’ long, and apparently the controller only charges if the PS3 is on!)
  • avoid playing when you are tired
  • be sure to take a 15-minute break every half hour
  • if you begin to feel ill, stop playing immediately

THANKS MOM, for the life coaching while waiting for your game to install.

I’m really hoping that smoking is an integral part of the game now.

[72 hours later, waiting for install #2 to complete…so I’ll post more. Yes, this makes 11 minutes of install time now.]

The second install also features the life coaching that the first install did. Nice.

I wouldn’t call smoking an integral part of the game, I’d almost call it a character. Mr. Cigarette appears all over the place, as a usable item, as a major plot point in most cut-scenes. There’s even a cigarette smoking monkey. That’s just awesome.

Another very strange thing is that whenever you start the game, before anything else you get an empty black screen with the standard console “this game uses autosave, so don’t unplug your console while its saving” message.  You have to press X before you even get to  the title screen.  This occurs every time you start the game.  Lame.

The game is also more like a soap opera with an interactive video game between scenes.  Every time you move into a new area, you get a phone call from someone.  A general, your psychologist, your friend’s former fiancé.  There’s a drama about how the colonel is the father of one of the female protagonists, but she grew up thinking he was her uncle, and now he’s married to your shrink, who calls you when you’re stressed out on the battlefield…

[And another hour or so in, I gave up on it.  There are just too many other good games to play, and MGS4:GotP just isn’t my style right now.]

Posted in General Tagged with: ,

Happy 1911 Day!

On March 29, 1911 the army adopted the John Moses Browning designed M1911 pistol.  And today, 100 years later, the 1911 is still used by some of the special forces groups of the military and is still one of the most popular handguns in the world. 

stock-1911The first gun I bought was a 1911 pistol.  It is still my favorite handgun to shoot, although shooting a lot of .45 gets expensive!  So I bought a Marvel Precision .22 LR conversion that allows me to shoot .22 LR,  and then I bought another (used) 1911 so that I didn’t have to keep swapping the conversion on and off.  The collection has grown, but I still shoot both of those pretty often.  I’ve even used the 45 in pistol league a few weeks, and it’s a lot of fun! 


sprThe 1911 is used in some of my all-time favorite movies, used by Robert De Niro in Ronin (I also love the car chases!), by Benicio Del Toro and Ryan Phillippe in The Way of the Gun (I also love the realism of the tactics they use!), and by Tom Hanks in Saving Private Ryan, shooting at a tank! (the last 5 minutes of Saving Private Ryan and Monsters, Inc get me teary eyed every time!)

A couple weeks ago, the M1911 officially became the state gun of Utah, more because J.M. Browning was a Utah native, and to celebrate the centennial than ay other reason.

So thank you very much, Mr. Browning, for your innovative work!  So innovative, that after selling the 1911 design to Colt, he had to design an entirely new pistol, the Browning Hi-power, to get around his own patents!  The hi-power’s centennial isn’t until 1935, so I have some time to get some of those before that rolls around!

Posted in General Tagged with:

XBox GamerCard

Recent Flickr

www.flickr.com

Archives